The Lord of the Rings Quiz
March 4, 2024 | Project

Technology
TL;DR
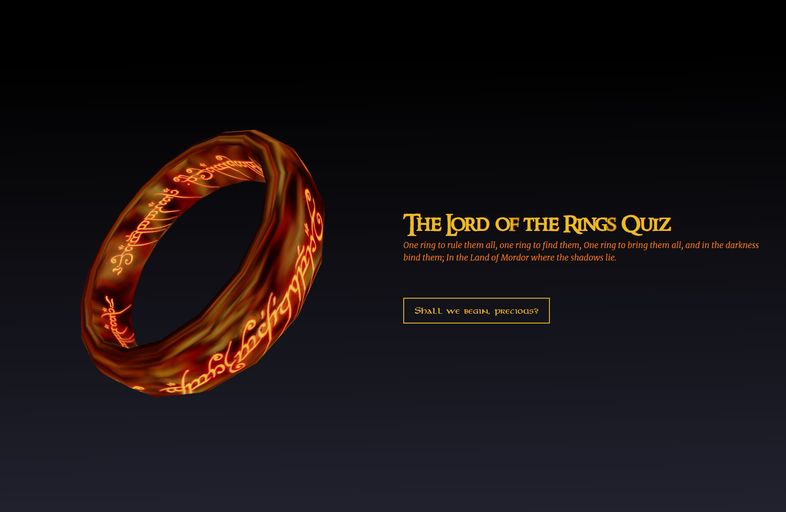
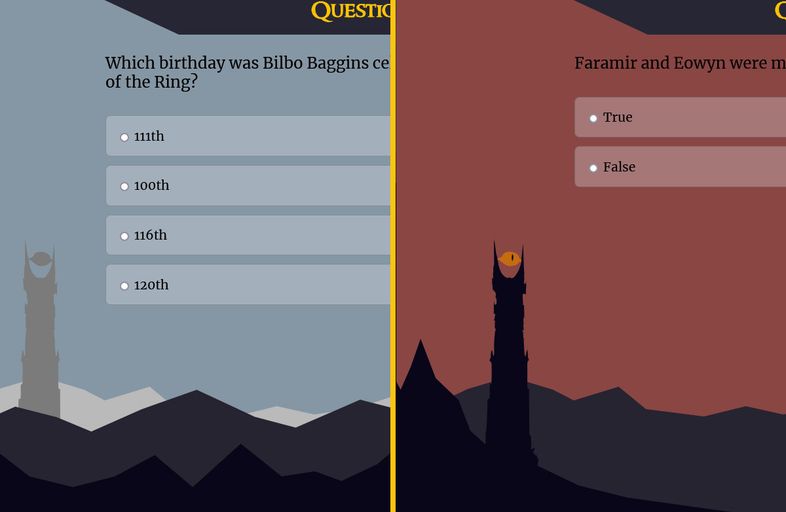
- Built a Lord of the Rings quiz featuring a glowing 3D ring model, dynamic backgrounds that change as you progress, and thematic quotes based on your score.
- Tackled some technical challenges along the way, like creating a timer component in React and making SVG landscapes work well on mobile.
- The project was a great excuse to learn React and play with 3D graphics, with plenty of "aha" moments.
Why I built this?
I built this as a fun way to to learn React, attempt some creativity, and play around with 3D graphics.
I had the idea when I playing an online quiz that tests how many of the top 200 Harry Potter characters you can name within 18 minutes. I thought it would be fun to make something similar for the Lord of the Rings, but quickly realized I can’t even spell half the names in Lord of the Rings. So I decided to make a multi-choice quiz.
Features
The Ring
The crown jewel of this project is the interactive ring on the landing page. As the ring spins around, you can see the fires of Mount Doom reflected on the metallic surface of the ring. Then, when a user interacts with the ring, the Elvish script glows brighter and dims again when they stop interacting with it.
I also tried adding some particles around the ring, but I ultimately took them out because of poor performance on mobile devices. Additionally, because the page is laid out in two columns with the canvas (where the ring is rendered) on the left and text on the right, the particles created an invisible line when they got too close to the column gap.
I might add them back in the future, but I would need to optimize the particle performance and extend the canvas to fill the viewport and then stack and position the text on top of it.
The reflections of Mount Doom
I created the reflection on the ring using an environment map. I like to think of environment maps as panoramic spheres, like the ones your phone creates by stitching together a series of photos into a seamless 360-degree image.
While there are some highly detailed environment maps out there, none of them really reflected the ambiance of Mount Doom. So I actually generated photos of fire using Stable Diffusion and just used the images without any additional processing since I didn’t need anything really detailed or even physically accurate.
Glowing Text
To make the text glow brighter on touch, I needed a model with an emissive texture (thankfully the one I downloaded did). The emissive texture is simply an image that wraps onto the model and tells the 3D engine which parts of the model should emit light with darker or black areas of the image emitting little to no light.
I initially thought I would have to use a bloom (it adds a sort of blur around the model to give it a glowing effect, check out this example).
However, I found that I could get a satisfactory result without it. I simply ended up bumping up the emissive intensity on hover using a React spring. This increased saturation of the text to give it a subtle glowing effect. Adding bloom would have made the glow extend off the ring with a blur, but I didn’t think it was worth the performance overhead.
Scenery Changes
As the quiz progresses the scenery changes as though making the journey to Mordor. This was achieved by simply applying different CSS classes with slow transitions based on the current question number .

Quiz Results
A different quote from the book is displayed depending on how well you did, as well as the result of each question. I used the canvas-confetti package to create the confetti canons for the perfect score.
Challenges.
Creating a timer component.
I wanted to create a timer component because what’s a quiz without some pressure, right? But this was my first attempt at a React app, and even creating something as straightforward as a timer felt like a surprising challenge. The end goal was to create a timer component that could be used with the following props.
- inititalTime: the amount of time the clock starts with and resets to.
- onEnd: a callback function to execute when the timer runs out (in this case advance to the next question)
- play: a boolean to control whether or not the timer is running. I added this because there is an intro animation, and I don’t want the timer to start until the animation is complete.
Timer.jsx
<Timer
  initialTime={30}
  onEnd={() => {
    next();
  }}
  play={!paused}
/>
Attempt #1.
I stored the time remaining on the clock and the timer in a React state variable. I wanted the timer (or more accurately, the setInterval’s id) in state because I wanted to be able to clear or pause it.
Timer.jsx
export function Timer({ onEnd, initialTime, start }) {
  const [time, setTime] = useState(initialTime);
  const [timer, setTimer] = useState();

  setTimer(
    setInterval(() => {
      if (time > 0) {
        setTime((t) => t - 1);
      }
    }, 1000)
  );

  return (
    <span className="timer">
      0:{time.toString().length === 2 ? time : `0${time}`}
    </span>
  );
}
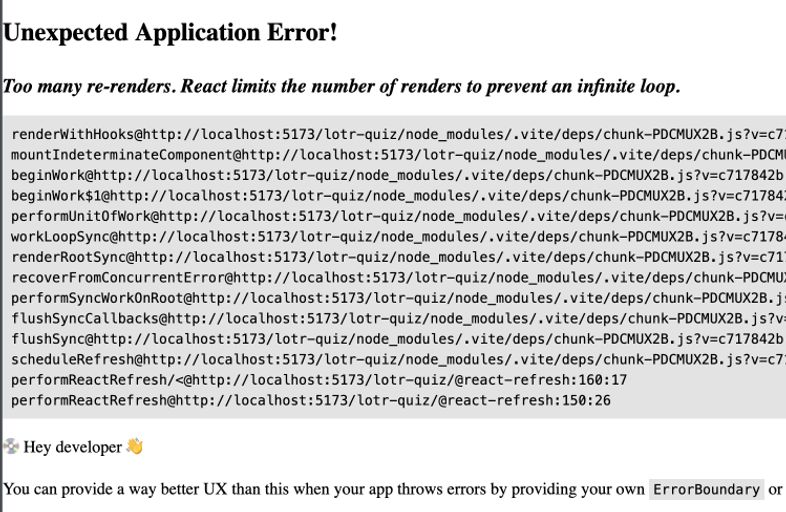
And before I knew it, I had created an infinite loop!

The problem is the setTimer(). When setTimer() is called the state is being updated. And in React, state changes cause a component to re-render, thus calling setTimer() again and again. So if that’s the case, then why don’t I just get rid of the timer state and just call setInterval() directly?
Attempt #2
Timer.jsx
import { useState } from "react";

export function Timer({ onEnd, initialTime, play }) {
  const [time, setTime] = useState(initialTime);

  setInterval(() => {
    if (time > 0 && play) {
      setTime((t) => t - 1);
    }

    if (time === 0) {
      onEnd();
    }
  }, 1000);

  return <p className="timer">{time}</p>;
}
Voila, there’s no error, but…. it’s not what I expected (nor wanted).
Turns out it’s the same problem as before. Unintentional timers are being created when time is updated using setTime() in the setInterval callback.
When the component is first added to the page, only one interval/timer is created. At least for a second until the first callback or tick is executed, which makes a state change causing the whole component to re-render and creating another setInterval. So, with every tick, more intervals are being created which is why with every second, the seconds on the timer keeps going down more and more.
Interestingly, and I’m not entirely sure why, the decrement between seconds appears to stabilize around 11-13. I’m guessing there may be some imposed limit or something to do with the intervals’ timing and React’s rendering cycle.
The useEffect hook
This is where the useEffect hook comes to the rescue. According to the documentation, “Effects are typically used to “step out” of your React code and synchronize with some external system. This includes browser APIs.”
The useEffect hook executes when its component first mounts or when its dependencies change, with dependencies specified in an array as the hook's second argument. The first argument being the (callback) function that is called on mount and when a dependency changes.
The callback function can also return a function to “clean up” any resources used in the callback function . The cleanup function is executed when the component leaves the page AND before every rerun when a dependency changes.
Refactoring the timer component
So, in my case I wrapped the setInterval in the useEffect callback and then called clearInterval in the cleanup function to stop the interval.
Timer.jsx
  useEffect(() => {
    const timerId = setInterval(() => {
      if (time > 0 && play) {
        setTime((t) => t - 1);
      }

      if (time === 0) {
        onEnd();
      }
    }, 1000);

    return () => clearInterval(timerId);
  }, [time, play, onEnd]);
While this code works, it’s not as performant as it could be. The issue is the dependency array. Anytime any of those change, the timer is cleared and new one is created. Since time is in the dependency array, a new timer is being created every second. Which is not what I want. Instead, the only thing that should require creating a new timer is if the timer is paused.
Timer.jsx
export function Timer({ onEnd, initialTime, paused }: TimerProps) {
  const [time, setTime] = useState(initialTime);

  if (time < 0) {
    onEnd();
    setTime(initialTime);
  }

  useEffect(() => {
    if (!paused) {
      const timerId = setInterval(() => {
        setTime((t) => t - 1);
      }, 1000);
      return () => clearInterval(timerId);
    }
  }, [paused]);

  return <p className="timer">{time}</p>;
}
Responsive Scenery SVG’s
On the bottom of the viewport there is a mountain landscape with Sauron’s tower (Barad-Dur) on the horizon. This graphic is an SVG which means it can scale up and down without losing any image quality. However, on mobile it would scale down way too much because the browser was trying to fit the entire width on the screen.
SVG View Box
I solved this problem using the SVG view box. If you have ever seen Star Trek or any sci-fi movie really, an image of some unexplained phenomena often comes up on the computer and someone invariably says, “Can you magnify and enhance section B4?”. And then sure enough the computer draws a box around the section, expands the cropped portion to fill the screen, and magically clarifies that portion to reveal the next clue in the mystery.
The SVG view box is quite similar, at least to the crop and magnify part. An SVG has a coordinate system where positive x goes right, and positive y goes down. And the view box attribute provides the coordinates to draw the view box (or what I like to think of cropping box). The property has 4 arguments (min-x, min-y, width, height). The first two give you the coordinates for the top left corner of view box and the rest of the coordinates are calculated with the provided width and height.
An SVG also has a “preserveAspectRatio” attribute that informs the browser how to scale and align the view box (cropped content) within the SVG container itself.
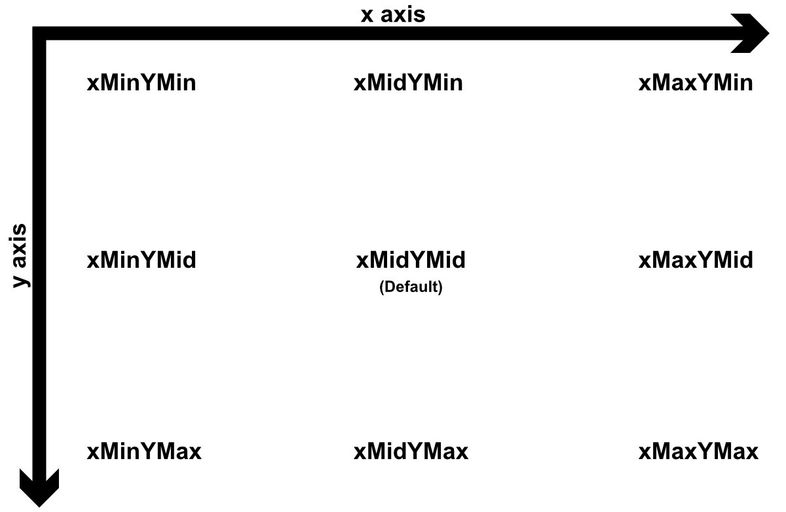
The syntax is preserveAspectRatio="<align> <meetOrSlice>”.
The first value (align) controls the positioning. It is like the “background-position” CSS property. Check out the chart below for possible values and their positions. In addition to the values on the chart, there is also “none” which stretches the content to fill the viewport and may even distort the graphic.

The “meetOrSlice” parameter is like CSS’ background-size property and has two possible values (meet or slice). Meet says to contain the view box within the SVG container (like background-size: contain). and slice will make the it fit but potentially clip off some edges to make it fill the container (like background-size: cover).
I ended up using a hook that sets up an event listener for window resizing and provided breakpoints that corresponded to different view box coordinates. This way I can change the screen size and control which portion of the SVG I wanted visible and how much of it to display (e.g., I wanted to make sure Sauron’s tower was always visible).
useViewbox.js
import { useState, useEffect } from "react";

export function useViewbox() {
  const [windowWidth, setWindowWidth] = useState(window.innerWidth);
  const [viewBox, setViewBox] = useState(getViewBox(windowWidth));

  function getViewBox(width) {
    const breakpoints = [
      { breakpoint: 450, viewBox: "800, 0, 1000, 800" },
      { breakpoint: 600, viewBox: "600, 0, 1200, 800" },
      { breakpoint: 960, viewBox: "600, 0, 1800, 800" },
      { breakpoint: 1800, viewBox: "600, 0, 2440, 800" },
      { breakpoint: 2200, viewBox: "0, 0, 5000, 800" },
    ];
    for (const breakpoint of breakpoints) {
      if (width <= breakpoint.breakpoint) {
        return breakpoint.viewBox;
      }
    }
    // Default case, return the last breakpoint
    return breakpoints[breakpoints.length - 1].viewBox;
  }
  useEffect(() => {
    setWindowWidth(window.innerWidth);
    function handleResize() {
      setViewBox(getViewBox(window.innerWidth));
    }
    window.addEventListener("resize", handleResize);
    return () => window.removeEventListener("resize", handleResize);
  }, []);
  return viewBox;
}
Lessons Learned and Thoughts
3D graphics
3D graphics is a deep and complex field that can quickly become overwhelming. When I first tried loading a 3D model as a fun experiment years ago, I gave up because all I got was a black screen. There were no errors in the console, and the Three.js documentation didn’t provide any answers. To make matters worse, the online resources I found were scarce and filled with unfamiliar terms like meshes, geometries, materials, shaders, raycasting, and textures.
The biggest challenge is that it’s hard to know what you don’t know, which can be incredibly frustrating when you’re eager to build something right away. It wasn’t until a couple of years later that I was able to create something like the ring in this project. I credit much of my progress to Bruno Simon’s Three.js course, which helped me understand the basics. For instance, I learned that some materials need a light source to be visible. Slowing down, focusing on one thing at a time, and embracing the unknown were key to really understanding how things work.
Since completing this project, I’ve made it a goal to practice daily learning. I try to dedicate 30–60 minutes each day to exploring something new. I keep a running list of courses, videos, and articles of things I’d like to learn. Each day, I pick an item from the list—usually sticking to a single topic for a while— This approach helps me avoid the overwhelm of trying to learn everything all at once and makes the process much more manageable.
React
Some people love it, some people hate it. And after my first encounter with React, I think it’s fine. Sure, it has its pros and cons, but at the end of the day, it feels like just another tool in the web developer's toolbox. What stood out to me about React were its rendering process, lack of built-in conveniences, and vast community ecosystem.
Rendering Process
One of the biggest surprises for me, especially during my timer challenge, was understanding that everything in a component function gets re-executed on every render. And re-renders happen more often than I expected! A component re-renders not only when its state or props change but also when its parent re-renders—even if the child receives no props/context/data from the parent.
Grasping this concept helped me better appreciate the utility of React hooks like useMemo, useCallback, and useEffect. Knowing when to use these hooks versus leaving code inside the component function has been a valuable lesson in writing more efficient React code.
Minimal Built-in Conveniences
Coming from Vue, React feels much more explicit and verbose to me. For example, Vue has built-in two-way data binding with its event system, whereas React requires passing both the value and a function to recreate the same functionality. I also missed some of Vue’s other conveniences, like named slots, transitions, directives (which feel cleaner than using .map() everywhere), and its lifecycle methods.
Ecosystem
These days, React seems to be the default choice for frontend development, and that comes with its perks. The ecosystem is vast, with a plethora of libraries and integrations specifically designed for React. Honestly, this is probably my favorite aspect of React—the sheer amount of community support, clear documentation, and resources available makes working with it easier in the long run.
Overall, this was a fun project. I liked being able to infuse some of my own creativity and passion for Lord of the Rings into the project while also learning more about React and 3D graphics on the web.


